

How To Draw An Ellipse By Hand
Blog
How to Describe an Ellipse
Bob Miller argues that with a few uncomplicated formulas and a clever jig, it becomes possible to draw and cutting ellipses of any size and add together this stately and pleasing shape to your piece of work.
An ellipse is a special kind of oval, in fact information technology's the well-nigh stately and refined of the ovals. What sets the ellipse apart from other ovals is that it can be mathematically divers and mechanically drawn. Most people volition await at an ellipse and simply call it an oval, but there is more than to it than that. With a few uncomplicated formulas and a clever jig, y'all can draw and cut ellipses of whatever size and add this stately and pleasing shape to your piece of work.
What makes an ellipse special is two points inside the shape called the "foci" (plural of "focus"). What makes them important is that the distance betwixt the focus, the edge, and the other focus is constant for any betoken on the perimeter of the ellipse. Non only does this result in an elegant and pleasing shape, simply it besides allows the ellipse to exist fatigued precisely and easily.
Since it is possible to ascertain an ellipse mathematically, this is where some math comes in. Simply don't worry; you can do it. All y'all demand to know is the overall size of the ellipse, defined by its length and width at its maximum points. These two dimensions are called the major centrality and the minor axis. From at that place it is possible notice the location of the foci, using this formula:
C=√(Aii-B2)
where C equals the distance betwixt the center and each of the foci and A equals the radius of the major axis and B equals the radius of the small-scale axis. Come across the diagram below to meet what goes where.

One time y'all know where the foci are located relative to the center of the ellipse, cartoon the ellipse becomes a d0ddle.
Simply bulldoze ii nails into the blueprint at the foci, and tie a loop of non-elastic string that hooks on both foci and when pulled taut reaches to whatever point on the ellipse. Then simply keeping the loop of string taut, move the pencil around the foci, letting the string guide your path. Because the string is a fixed length, it will go on the pencil equidistant from both foci and will neatly and cleanly define an ellipse. Run into the following diagram and video for how this works.

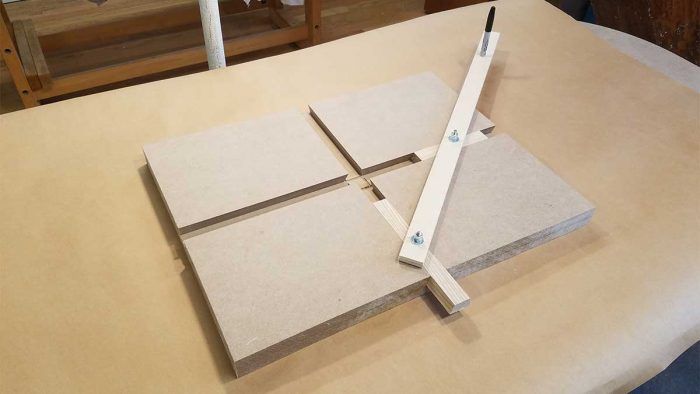
While the string method is not bad for drawings and layout, to really cut a precise ellipse you will demand an ellipsograph, a clever jig that tin movement in an elliptical shape and carry anything from a pencil to a router. The ellipsograph is quite simple; all is required is two dovetailed tracks in MDF that are perpendicular to each other. Two pieces of hardwood are then milled to a sliding fit in the tracks and a commodities added at their centers.

Attach a rigid plywood arm to both bolts. To control the size of the ellipse, y'all need to know the major and minor radius of the ellipse (A & B from the formula above). Attach a router to the plywood arm and so adhere it to the two sliding blocks. Attach one block the minor altitude from the router and the other the major distance from the router. As you maneuver the arm effectually the ellipse, the two sliders will bypass each other in the jig and movement the end of the arm in a perfect ellipse!
Don't fright the ellipse, and don't fear the doing the math to make it happen.

Source: https://www.finewoodworking.com/2019/10/02/how-to-draw-an-ellipse
Posted by: lopezbrounally.blogspot.com
0 Response to "How To Draw An Ellipse By Hand"
Post a Comment