

How To Enter A List Of Names Into Label Print Templates
Print labels for your mailing list
Word for Microsoft 365 Word for Microsoft 365 for Mac Give-and-take 2021 Word 2021 for Mac Word 2019 Give-and-take 2019 for Mac Discussion 2016 Word 2016 for Mac Give-and-take 2013 Word 2010 Discussion 2007 Word for Mac 2011 Word Starter 2010 More...Less

With your address list prepare in an Excel spreadsheet, Outlook Contacts, or a new list you created, y'all can utilise mail merge in Word to create mailing labels.
-
Get to Mailings > Start Post Merge > Labels.
-
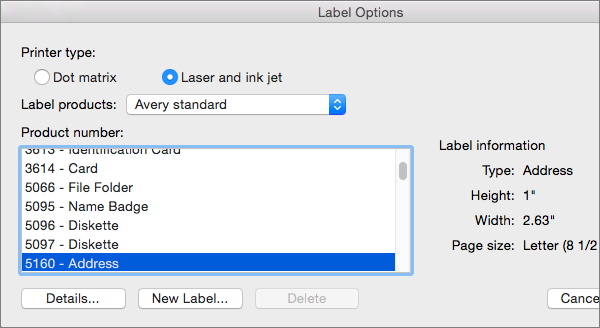
In the Label Options dialog box, cull your characterization supplier in the Characterization vendors list.
-
In the Product number list, choose the production number on your package of labels.
Tip:If none of the options match your labels, cull New Characterization, enter your characterization's data, and give information technology a name. Choose OK to add the new label to the Production number listing.
-
Choose OK.
Your document now displays a table with an outline of the labels. If you don't see the table, go to Tabular array Layout and select View Gridlines.
-
Go to File > Salvage to salve your document.
-
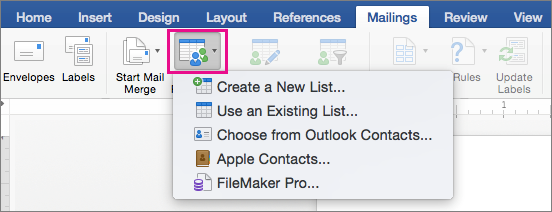
Go to Mailings > Select Recipients, and then choose an option.
For more info, meet Data sources y'all can use for a mail service merge.
-
Select OK.
-
Go to Mailings and do i of the post-obit:
-
For only an accost, select Address block. For more info, come across Insert Address Cake dialog.
-
For other merge fields, select Insert Merge Field. For more info, meet Insert post merge fields.
-
-
Format the fields in the beginning characterization and then information technology looks the way you want the residual of your labels to await.
-
Select Mailings > Update Labels.
-
Go to Mailings > Preview Results.
Tip:Choose Preview Results once again to view, add together or remove merge fields. Select Update labels when done if you make changes.
-
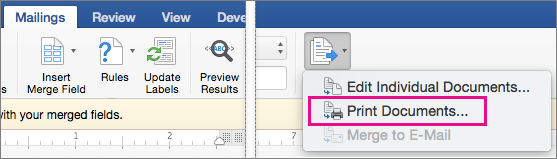
Go to Mailings > Terminate & Merge > Print Documents.
Tip:To review and update each label individually before printing, go to Mailings > End & Merge > Edit Private Documents. When done, go to File > Print.
Meet too
To create a page of labels with graphics, run across Add together graphics to labels
To add barcodes to your mailing listing labels, meet Add barcodes to labels
-
Go to Mailings > Start Mail Merge > Labels.

-
In the Characterization Options dialog box, cull your label supplier in the Label products list.
-
In the Product number list, choose the product number on your package of labels.
Tip:If none of the options match your labels, choose New Characterization, enter your label's information, and give information technology a proper noun. Cull OK to add the new label to the Production number list.
-
Cull OK.
Your document now displays a table with an outline of the labels. If you don't come across the outline, go to Tabular array Layout and select View Gridlines.
-
Go to File > Salvage to save your document.
-
Go to Mailings > Select Recipients, and and so choose an pick.
For more info, see Data sources you can use for a mail service merge.
-
Select OK.
-
Go to Mailings > Insert Merge Field and select the fields to show on your labels.

-
Choose OK.
-
Format the fields in the beginning label so it looks the way you want the rest of your labels to look.
-
Go to Mailings > Update Labels.
-
Get to Mailings > Preview Results.

Choose Preview Results over again to view, add together or remove merge fields. Select Update labels when washed if you make changes.
-
When the labels await the way you want, get to Mailings > Cease & Merge > Print Documents.
Tip:To review and update each label individually before printing, get to Mailings > Finish & Merge > Edit Individual Documents. When you're washed, get to File > Print to print the labels.
Encounter also
Create and print labels
Create a data source for a mail service merge
Important: Role for Mac 2011 is no longer supported. Upgrade to Microsoft 365 to work anywhere from any device and proceed to receive support.
Upgrade now
When you perform a mail merge, Discussion inserts the records from a data source, or recipients listing, into your principal certificate. A recipients list for a mail merge functioning tin be an Excel canvass, the Function Address Book, a FileMaker Pro database, a Word document, or a delimited text file.
Important:Y'all must take an existing recipients listing, such as a Word document that has addresses, to complete this process. For more than information about how to set up a recipients list, see Create a data source for a mail service merge
-
On the File carte, choose New Blank Document.
A new, blank Word document opens. This becomes your chief document.
-
On the View carte du jour, cull Print Layout.
-
On the Tools carte du jour, choose Mail Merge Director.
-
Under ane. Select Document Type, select Create New, then choose Labels.
-
Under Printer data, choose the type of printer that you employ.
-
On the Characterization products pop-up menu, click the manufacturer of your labels.
Tip:For more characterization products, on the Label products popular-up menu, choose Other.
-
Nether Product number, select the type of label that yous take, and so cull OK.
Tip:For information most the margins and other characteristics of a characterization, choose Details.
-
In the Mail Merge Manager, nether ii. Select Recipients List, choose Get List, and then select the source for the recipients list (for example, Part Address Book).
-
On the Insert Merge Field pop-up menu, choose a field name in the listing (for example, FirstName).
Word adds the field proper noun to the Sample label box.
Tip:To return to this dialog box subsequently, in the Mail Merge Manager under two. Select Recipients List, choose Add or remove placeholders on labels
 .
. -
Repeat step 9 for each field that you desire to appear in your labels.
-
After y'all add all the fields that y'all want, cull OK.
Your field names are copied into all the labels in your main document.
-
In your main document, edit the start characterization to add together spaces, commas, and carriage returns where you want them.
-
In the Mail Merge Manager, under 2. Select Recipients List, c Fill up in the items to complete your document
 .
.Word applies the formatting that y'all use for the first characterization to all the labels.
-
To finish your labels, do 1 of the following:
| To | Do this |
|---|---|
| Preview your labels | In the Mail Merge Manager, under 5. Preview Results, choose View Merged Information |
| Print your labels immediately | In the Post Merge Manager, under 6. Complete Merge, choose Merge to Printer |
| Create a document that contains your merged labels that you can save | In the Post Merge Manager, under six. Consummate Merge, choose Merge to New Certificate |
 .
. .
. .
.Run across also
Create and print labels
Create envelopes past using Mail service Merge
Create a information source for a mail merge

How To Enter A List Of Names Into Label Print Templates,
Source: https://support.microsoft.com/en-us/office/print-labels-for-your-mailing-list-276a2cd1-74d2-43d0-ab5a-b90460358ad5
Posted by: lopezbrounally.blogspot.com
0 Response to "How To Enter A List Of Names Into Label Print Templates"
Post a Comment